The popular memory of Dunkirk still leans on one clean image: small civilian boats crossing the Channel to save a stranded army.[1] That image preserves one truth, but it flattens the event's real mechanism. Operation Dynamo worked because the British and French improvised a two-part loading system under fire. The beaches handled men who could not be reached by deep-draught ships. The East Mole, a long sea wall projecting into deeper water, let destroyers, steamers, and other larger vessels take thousands aboard far faster than surf evacuation alone could manage.[1][2][3] The little ships mattered, but mostly as connectors inside that larger machine.
That is why the East Mole matters historically. Dunkirk's harbor had been damaged, the beaches were shallow, and queues of men could not simply be walked straight onto major warships.[1][3] What solved the problem was not a single romantic flotilla but an improvised port logic. Small craft shuttled from shore. Larger ships worked where they could safely load. The mole turned depth into time, and time into lift. Once that system stabilized, a rescue first imagined at roughly 20,000 to 30,000 men became an evacuation of more than 338,000 Allied troops between 26 May and 4 June 1940.[1]
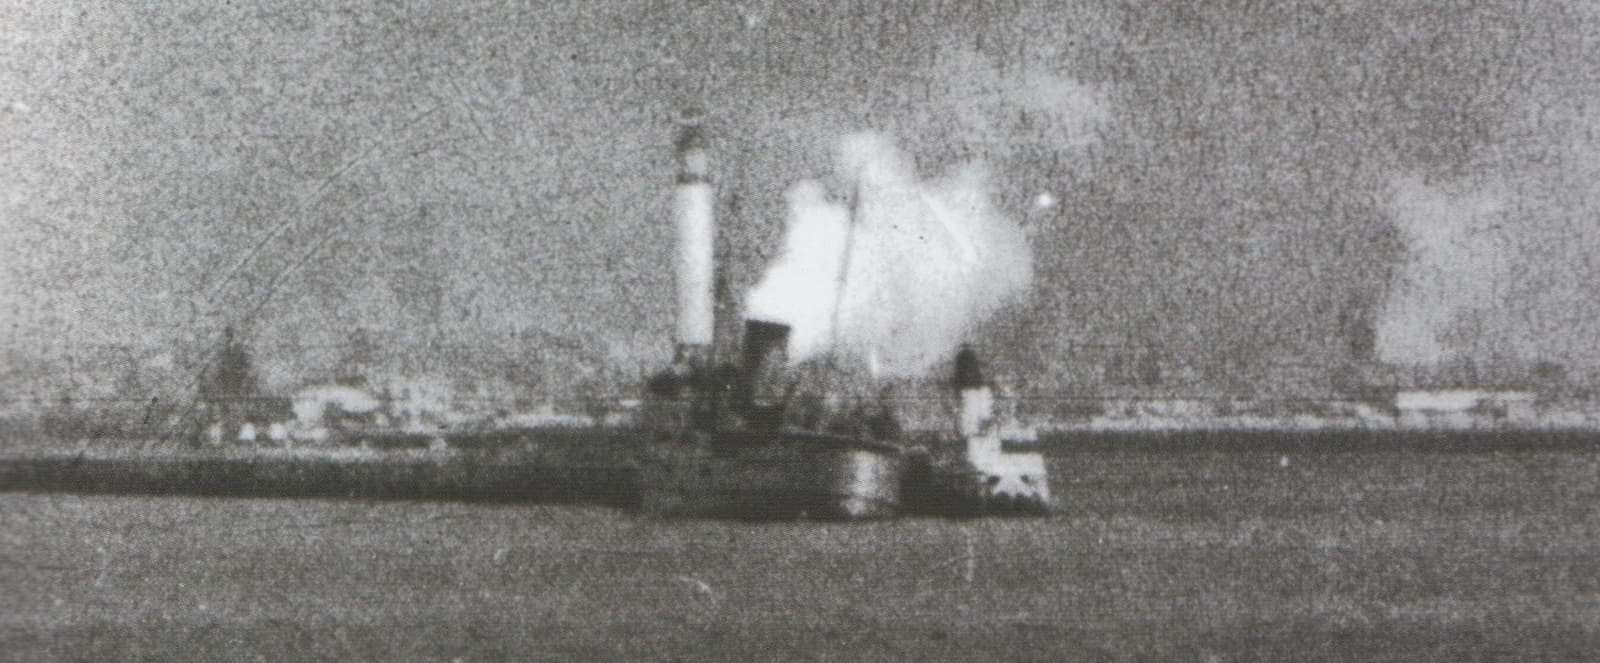
The cover image, a Royal Navy photograph of the paddle steamer Fenella at the East Mole under air attack, puts the mechanism in one frame.[5] This was not a tidy harbor operation. It was a narrow line of loading carried out inside smoke, bombing, and artillery pressure. The East Mole looks like a modest strip of infrastructure, but in the chronology of Dunkirk it behaved like a substitute port.
Timeline anchors
- 10 May 1940: Germany invaded the Netherlands, Belgium, and Luxembourg, beginning the campaign that drove Allied armies back toward the Channel.[2]
- 19 May 1940: German forces reached Abbeville and cut off Allied troops in Belgium and northern France from the south.[2]
- 24 May 1940: Hitler's halt order left German armor temporarily paused while the Dunkirk perimeter was still forming; the German 1st Panzer Division was only 24 km (15 miles) away.[2]
- 26 May 1940: Operation Dynamo began under Admiral Bertram Ramsay's direction from Dover.[1]
- 28 May 1940: the Belgian surrender widened pressure on the perimeter and increased the urgency of evacuation.[2]
- 31 May 1940: evacuation traffic was already delivering troops back to Dover in large numbers, even as loading under fire continued at Dunkirk.[1][4]
- 3 June 1940: most British troops had been lifted; by that point roughly 328,000 Allied troops had already been taken off according to the National Army Museum's summary.[2]
- 4 June 1940: remaining resistance ended after French rearguard forces covered the final stage of evacuation.[1]
Those dates matter because they keep Dunkirk from turning into a miracle story detached from sequence. The operation was not one sudden salvation. It was a rapidly improvised throughput problem solved step by step while the perimeter kept shrinking.
The trap closed faster than the evacuation plan expected
The first phase of the story is military collapse, not maritime ingenuity. As the National Army Museum's overview makes clear, the Allied move into Belgium met the German feint while the main armored thrust broke further south through the Ardennes and across the Meuse.[2] Once German forces reached the Channel coast at Abbeville on 19 May, the British Expeditionary Force and other Allied units in the north were effectively cut off from orderly withdrawal inland.[2] Dunkirk became important not because it was ideal, but because it was what remained.
Even that remaining option was poor. The town sat behind beaches whose gentle gradient made loading slow and exposed. The harbor itself could not simply resume normal commercial behavior under bombing and shellfire.[1][3] Churchill's government and the Admiralty were not planning a ceremonial extraction. They were trying to get a field army off a narrowing strip of coast before the perimeter collapsed.
The myth of inevitability begins to creep in here. Because more than 338,000 men were ultimately saved, it is easy to read the result backward and imagine that the route out had been obvious from the start.[1] The numbers argue the opposite. British planners initially hoped to recover perhaps 20,000 to 30,000 troops.[1] That expectation tells you what the operation looked like at birth: limited, desperate, and uncertain. The later scale was not built into the first assumption. It had to be engineered under pressure.
Beaches alone could not lift an army
Imperial War Museums states the physical problem plainly: Dunkirk's gently shelving beaches meant large warships could not simply come inshore and embark men directly.[1] That fact is more important than almost any patriotic slogan attached to the episode. If destroyers and cross-Channel steamers could not come close enough to load efficiently from the sand, then an army of hundreds of thousands could not be evacuated by beach wading alone before German pressure closed the window.
Royal Museums Greenwich's description of Richard Eurich's wartime Dunkirk painting, though written about a reconstructed artwork rather than a photograph, is especially useful on this point because it isolates the evacuation geometry.[3] The two moles were the main evacuation points, while many other troops waited on beaches west and north of the town. Long queues snaked to the water's edge. Small boats came inshore to carry men out to larger shipping. Some boats heeled or capsized when overloaded.[3] That is the operation in miniature: queue, transfer, shuttle, reload, repeat.
The British Legion oral history on its remembrance page gives the same mechanism from ground level. Harry Leigh-Dugmore recalled queueing for nearly two days for boats coming to the mole while German aircraft bombed and machine-gunned the area, then finally casting off at 0600 and reaching Dover at 0900 after navigating around minefields.[4] That memory is valuable because it reminds us that "evacuation" did not feel like a smooth conveyor belt to the men inside it. It felt like waiting, dispersing under attack, returning to the line, and hoping the queue would turn into deck space before the next strike.
If the beaches had been the whole solution, throughput would have stayed too low. Men could reach the water, but the water itself was the bottleneck. The operation needed a place where larger vessels could receive troops quickly enough to make repetition meaningful.
The East Mole turned depth into time
This is the hinge of the reconstruction. IWM notes that large warships could pick up soldiers from the town's East Mole because it extended into deep water.[1] That one structural fact changed the scale of what evacuation could mean. Instead of relying only on boats ferrying a few dozen men at a time from the surf, the mole allowed destroyers and steamers to come alongside and load in much larger blocks. It was not a full harbor restoration. It was something more improvised and more historically interesting: a damaged port's surviving edge being repurposed as a loading spine.
Seen that way, the East Mole was not a background detail in the Dunkirk story. It was the piece of infrastructure that converted rescue into throughput. The beaches produced men in endless lines. The mole gave larger ships access to enough depth to turn those lines into departures.[1][3] Once loading at the mole accelerated, the evacuation stopped being merely a succession of heroic individual pickups and started behaving like a transport system.
The Fenella photograph used here captures that transformation under its actual conditions.[5] Smoke rises, the vessel lies exposed, and the line of embarkation is inseparable from the risk of being hit. Nothing in the image suggests stability. That is exactly why it belongs with this article. The East Mole did not become useful because it was safe. It became useful because, under the alternatives then available, it was faster than trying to lift an army from shallow water alone.
The little ships mattered differently than the myth suggests
None of this demotes the civilian craft. It locates them more precisely. IWM notes that the Admiralty appealed to the owners of small boats because those craft could work the shallow approaches and carry men outward where larger ships could not come in.[1] In other words, the little ships were essential, but essential as part of a layered system. They were not the whole rescue. They were the linking tissue between sand and steel hulls.
That distinction helps explain why Dunkirk later generated such a powerful but partial national legend. A line of destroyers loading at a sea wall is operationally decisive, but less intimate in memory than little boats nosing into surf under fire. The smaller craft make the event feel civilian, voluntary, and improvisational. All of that is true. It is just not the entire mechanism.[1][3][4]
The National Army Museum summary reinforces the same correction from another angle. It attributes the scale of success not only to naval effort and civilian ships, but also to rearguard actions at Boulogne, Calais, and elsewhere, plus the time bought by the temporary German halt order.[2] Dunkirk therefore worked because several clocks were made to run together: perimeter defense, beach shuttles, mole loading, Channel crossings, and reception in England. The operation's achievement lies in coordination under narrowing conditions, not in a single image of patriotic spontaneity.
By 3 June the machine had done its main work
By the time the last British troops were evacuated on 3 June, the main burden of the operation had already been carried.[1][2] The National Army Museum places the figure at about 328,000 Allied troops removed by that point despite intensive bombing and artillery fire.[2] IWM gives the final total at more than 338,000 by the end of 4 June, with French forces covering the closing phase.[1] The difference between those totals is less important than what they show together: the operation became large because it kept loading day after day under conditions that should have broken its rhythm.
Dunkirk has every reason to live on as a story of nerve. But nerve by itself does not explain why so many men got out. The stronger historical reading is infrastructural. A bombed coastline was turned into a temporary embarkation system. Beaches fed bodies into small craft. Small craft and the East Mole fed larger ships. Larger ships fed Dover and other English ports. The queue moved because a sea wall became a port long enough for the army to survive.
That is why the East Mole deserves a central place in the memory of May-June 1940.[1][3][5] It was a piece of ordinary harbor architecture that briefly acquired strategic weight out of all proportion to its appearance. Dunkirk did not succeed because history paused and handed Britain a miracle. It succeeded because, under extraordinary pressure, enough people discovered how to make a damaged edge of infrastructure do the work of an entire port.
Sources
- Imperial War Museums, "What you Need to Know about the Dunkirk Evacuations" - dates, expected rescue scale, East Mole loading, little ships, and final evacuation totals.
- National Army Museum, "Defeat in the West, 1940" - German breakthrough sequence, the 24 May halt order, the 3 June evacuation figure, and the role of rearguard actions.
- Royal Museums Greenwich, "Withdrawal from Dunkirk, June 1940" - physical description of the two moles, beach queues, small-boat transfer pattern, and loading under bombardment.
- Royal British Legion, "Remembering Dunkirk" - Harry Leigh-Dugmore's account of queueing at the mole, embarking under attack, and reaching Dover.
- Wikimedia Commons, "File:Fenella at the East Mole, Dunkirk..jpeg" - Royal Navy photograph from the Imperial War Museums collection used as the article image.